Upload OBS FLV Video to YouTube/Vimeo for Sharing on Windows/Mac Overview: Some users complain that "My attempts at uploading OBS FLV video to YouTube/Vimeo fail during processing." It's obvious that import OBS FLV video to YouTube/Vimeo may cause some issues.  Source: Upload OBS FLV Video to YouTube/Vimeo Open Broadcaster Software is free and open source software for video recording and live streaming. Have you ever recorded some game footage with OBS? Generally OBS saves files as MP4 or FLV. It says that the files can be uploaded straight to YouTube or other video hosting site just fine. But why I encounter incompatible issues when importing OBS FLV video to YouTube/Vimeo or other situations like OBS videos to Premiere, OBS FLV to Avid, OBS FLV to DaVinci Resolve? FLV usually comes from a video-sharing website like YouTube, Vimeo or from OBS (Open Broadcaster Software), etc. Though FLV is the same format with YouTube supported one, the codec of OBS FLV videos is totally different from YouTube best accepted one. Since YouTube is the most popular website where we can upload our favorite videos to it for sharing online with other people, any good solutions to transcode OBS FLV video to YouTube/Vimeo directly? To upload OBS FLV video to YouTube/Vimeo flawlessly, you'll need to convert OBS FLV to YouTube/Vimeo both compatible format. In this case, Pavtube Video Converter for Mac is the first and best choice for you. With the recent upgraded version 4.8.5.1, it can encode/decode H.265/HEVC videos so nicely. If you are running on Windows, you can refer to the equivalent version Pavtube Video Converter.
 Other Download:
How to upload OBS FLV video to YouTube/Vimeo for sharing on Windows/Mac? (Take Mac version as an example.) Step 1. When you download and install the Mac Video Converter, open the main interface and choose the "Add video" to load your OBS FLV videos in. For the multiple video clips we can hit the "Add from folder" button.
Other Download:
How to upload OBS FLV video to YouTube/Vimeo for sharing on Windows/Mac? (Take Mac version as an example.) Step 1. When you download and install the Mac Video Converter, open the main interface and choose the "Add video" to load your OBS FLV videos in. For the multiple video clips we can hit the "Add from folder" button. 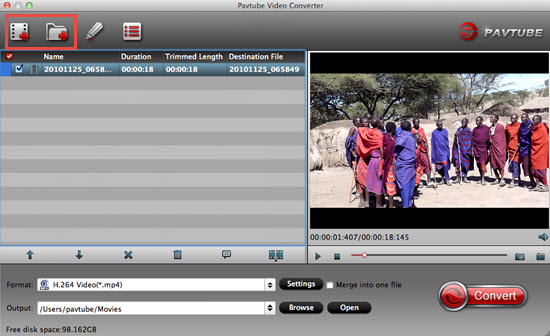 Step 2. Before choosing the format, you can check about the supported formats of YouTube and Vimeo first then decide which output format to choose. As we can see from those two sites, both the H.264 codec contained with MP4 can be supported by them both. So we go to the "Format" bar then choose "HD Video>>H.264 HD Video (*.mp4)" as the output format.
 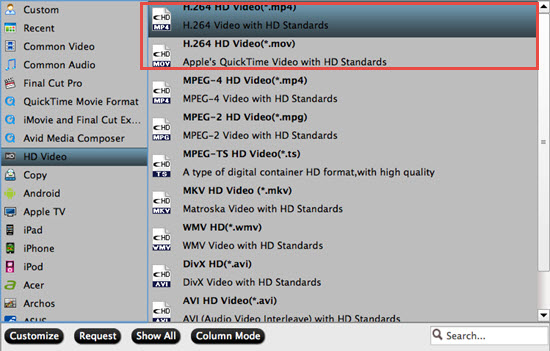 Step 3. Most of you guys must have the desire of a further editing with your output videos, right? On the main interface, "Edit" is waiting for you. "Trim" to decide where to start and where to end, "Crop" to cut some unwanted clips, "Subtitles" to add some explanations to your audience. Step 4. Click the "Convert" button under the preview window and the Mac Video Converter starts converting. By the way, you can take a screenshot at your favorite frame. Conclusion: After converting, you can click the "Open" button to find your converted files. Now, you can upload OBS FLV video to YouTube/Vimeo for sharing on Windows/Mac without any worries! What are you waiting for? Just go ahead and have a try! Enjoy it! More Tips: Play Canon Videos on Windows Media Player Work DJI Inspire 1 4K Videos with Adobe Premiere Pro Edit Samsung NX500 4K H.265 AVI/MP4 in iMovie/FCE Convert NX500 H.265/HEVC 4K Video to Ultra HDTV for Playing Samsung NX500 H.265 to FCP X Workflow on Mac OS X Yosemite Import WX500 XAVC S to iMovie for Editing Convert AX30 4K XAVC S to ProRes/AVI/MPEG-2/WMV for Editing Encode/Decode PXW-X70 XAVC-L MXF to Avid MC 8 on Mac Edit Sony DSC-WX500 XAVC S in DaVinci Resolve Lite Ingest NX500 4K H.265/HEVC to QuickTime for Playing Best HX90/HX90V XAVC S Video Converter for PC/Mac Edit Sony HX90V XAVC S in Sony Vegas/Pinnacle/WMM Good News! Pavtube Bundles Dealsare coming! If you want to import/preserve/mix multi-track MXF in MKV/MP4/MOV formats, get multi-track Apple Prores MOV for further editing in Final Cut Pro (X), the following bundled software is your best choice:? --------Video Converter($35) + MXF MultiMixer($45) = $54.9, Save $25.1 (buy link) --------Video Converter for Mac($35) + iMixMXF($45) = $54.9, Save $25.1 (buy link) Go ahead and click the link to get your coupon. Save up to $44.1!Never miss!!!
XAVC-S in Avid - Edit Sony a7 II XAVC S in Avid MC Overview: If you got some troubles in editing Sony a7II XAVC S recordings in Avid Media Composer for further editing, here we can give you some suggestions. Source: Sony a7 II XAVC S and Avid Workflow on Mac You cannot get rid of the trouble when importing your XAVC S MP4 recordings to Avid Media Composer which shot from Sony a7 II camera? If so, you may wish to read this post. It explains an easy to convert Sony a7 II XAVC S video for editing in Avid with good quality. From XAVC S MP4 to DNxHD MOV, you are supposed to get a XAVC to Avid Converter that can do this work well.  Issues when importing Sony a7II XAVC files to Avid Media Composer? "Hi, I'm trying to import video recordings from the new Sony a7 II to Avid MC6. The camera uses a flavor of MP4 that is called XAVC-S. I have tried the traditional importing method, but there's no go. I have also tried the AMA plug-in created by Sony, unfortunately, it doesn't seem to support Sony a7 II XAVC-S footage. Does that mean I have to use 3rd party software to convert formats? If so, does anyone know of a good XAVC-S Converter that is worth trying?" Relationship between XAVC S files and Avid Media Composer Since the XAVC S footage is a peripheral non-standard format which is not supported by Avid Media Composer, Some other NELs are not suitable too, such as FCP, Sony Vegas etc. In order to import Sony Alpha a7II XAVC S footage into FCP for smoothly editing, we can render to the famous third-party software Pavtube HD Video Converter for Mac to help us to convert XAVC to DNxHD .mov. Tips: For those Windows users, Windows XAVC Converter is also allowed here. What I need to mention is with this windows and mac product can support the latest video codec H.265/HEVC (H.265 Decode and Encode Guide) well. Do you wanna a try? Other Download:
Guide: How to convert XAVC S to DNxHD MOV for editing in Avid MC? Step 1. Start up HD Video Converter for Mac as a professional Sony a7 II XAVC S to Avid MC Converter. When its main interface pops up, click "Add File" to input your source media with individual clips or in a complete folder.
Issues when importing Sony a7II XAVC files to Avid Media Composer? "Hi, I'm trying to import video recordings from the new Sony a7 II to Avid MC6. The camera uses a flavor of MP4 that is called XAVC-S. I have tried the traditional importing method, but there's no go. I have also tried the AMA plug-in created by Sony, unfortunately, it doesn't seem to support Sony a7 II XAVC-S footage. Does that mean I have to use 3rd party software to convert formats? If so, does anyone know of a good XAVC-S Converter that is worth trying?" Relationship between XAVC S files and Avid Media Composer Since the XAVC S footage is a peripheral non-standard format which is not supported by Avid Media Composer, Some other NELs are not suitable too, such as FCP, Sony Vegas etc. In order to import Sony Alpha a7II XAVC S footage into FCP for smoothly editing, we can render to the famous third-party software Pavtube HD Video Converter for Mac to help us to convert XAVC to DNxHD .mov. Tips: For those Windows users, Windows XAVC Converter is also allowed here. What I need to mention is with this windows and mac product can support the latest video codec H.265/HEVC (H.265 Decode and Encode Guide) well. Do you wanna a try? Other Download:
Guide: How to convert XAVC S to DNxHD MOV for editing in Avid MC? Step 1. Start up HD Video Converter for Mac as a professional Sony a7 II XAVC S to Avid MC Converter. When its main interface pops up, click "Add File" to input your source media with individual clips or in a complete folder.  Step 2. Select suitable output for Avid Media Composer Convert Sony a7 II XAVC S MP4 files to DNxHD for Avid MC. From "Format" bar on the main interface, just drop down the list and select "Avid Media Composer DNxHD (*.mov)" as output format under "Avid Media Composer" column.
  Step 3. Optional function to customize video and audio settings If necessary, you can click "Settings" button and go to "Profiles Settings" panel to modify video and audio settings like video encoder, resolution, video bit rate, frame rate, aspect ratio, audio encoder, sample rate, audio bit rate, and audio channels. 3D settings are also available. Step 4. Then we are going to come to the final step, click the "Convert" button on the main interface and start out job. If you are the first time to work with this Avid MC, some related tips you can take a reference in this transferring guide[/ur]. What's more, this third-party can hold almost all formats for editing in various popular editing tools, that's why it has a good reputation online.
More Tips:
Good News: Never miss to get Saving up to $44.1, MXF/MTS/M2TS/MKV/FLV/MOV Converter.etc at Pavtube Bundles Deals, such as: HD Video Converter for Mac($35) + DVD Creator for Mac($35) = $39.9, Save $30.1
Encode Sony WX500 XAVC S to MPEG-2 for Premiere Pro CC/CS Overview: "As far as I know the latest XAVC S high-speed format introduced by Sony WX500 is still not supported well by Premiere Pro CC so far. If you want import XAVC S into Premiere Pro CC? This article will show you the XAVC S to Premiere Pro CC workflow on Mac."  Why our users love Sony WX500 camera so much? Like the HX90, the WX500 is designed to meet the requirements of novice photographers and offers a collection of automatic shooting options, but there are also exposure modes to suit more experienced photographers: shutter priority, aperture priority and manual. Videos, however, can be shot in Full-HD at 8 bit and 4:2:0 at up to 50Mbps in AVCHD, MP4 or the new XAVC S format at 50/60p. Causes of XAVC S files cannot be suitable for Premiere Pro CC/CS? Granted, Premiere Pro CC/CS can handle (usually) 4K XAVC S files without much problem, but it is extremely hardware intensive. Thankfully you probably don't have to buy a new computer, but you do need to convert XAVC S to Adobe Premiere Pro using MPEG-2 (1080p) as primary delivery format (Native support formats by Adobe Premiere). As same as the issues appeared in other NLEs like FCP, iMovie, FCE, After Effects, Avid Media Composer, etc., so let's find the solutions below:
Any good professional converting tools can offered to us? For me, of course, I don't like convert my source videos, because the quality loss (even you can't tell from your eyes), but if you have been driven crazy by this problem, then you may like to have a try. What I've tried is to convert XAVC S to MPEG-2 for Premiere Pro CC/CS with the help of Pavtube Video Converter for Mac. For Windows users, Pavtube Video Converter is the alternative choice. Since Windows and Mac version have upgraded to 4.8.5.1, it can also encode/decode H.265/HEVC videos on the latest Windows 10 and Mac Yosemite 10.10 so nicely. How to convert WX500 XAVC S to MPEG-2 for Premiere Pro CC/CS editing? Step 1: Launch the corresponding version as the best XAVC S to Premiere Pro Converter, and click the "Add video" or "Add from folder" button to load your source files from your backup folder.
Why our users love Sony WX500 camera so much? Like the HX90, the WX500 is designed to meet the requirements of novice photographers and offers a collection of automatic shooting options, but there are also exposure modes to suit more experienced photographers: shutter priority, aperture priority and manual. Videos, however, can be shot in Full-HD at 8 bit and 4:2:0 at up to 50Mbps in AVCHD, MP4 or the new XAVC S format at 50/60p. Causes of XAVC S files cannot be suitable for Premiere Pro CC/CS? Granted, Premiere Pro CC/CS can handle (usually) 4K XAVC S files without much problem, but it is extremely hardware intensive. Thankfully you probably don't have to buy a new computer, but you do need to convert XAVC S to Adobe Premiere Pro using MPEG-2 (1080p) as primary delivery format (Native support formats by Adobe Premiere). As same as the issues appeared in other NLEs like FCP, iMovie, FCE, After Effects, Avid Media Composer, etc., so let's find the solutions below:
Any good professional converting tools can offered to us? For me, of course, I don't like convert my source videos, because the quality loss (even you can't tell from your eyes), but if you have been driven crazy by this problem, then you may like to have a try. What I've tried is to convert XAVC S to MPEG-2 for Premiere Pro CC/CS with the help of Pavtube Video Converter for Mac. For Windows users, Pavtube Video Converter is the alternative choice. Since Windows and Mac version have upgraded to 4.8.5.1, it can also encode/decode H.265/HEVC videos on the latest Windows 10 and Mac Yosemite 10.10 so nicely. How to convert WX500 XAVC S to MPEG-2 for Premiere Pro CC/CS editing? Step 1: Launch the corresponding version as the best XAVC S to Premiere Pro Converter, and click the "Add video" or "Add from folder" button to load your source files from your backup folder.  Step 2: To import WX500 XAVC S files to Adobe Premiere Pro, you can hit the "Format" bar and follow "Adobe Premiere/Sony Vegas" column and select "MPEG-2 (*.mpg)" as output format.
  Step 3: If the default settings do not fit your needs, you can click "Settings" button to adjust audio and video parameters as you like. Step 4: Finally, click "Convert" button and your XAVC S files from Sony WX500 will be converted to MPEG-2 files and later are ready to be imported to Premiere Pro CC/CS for editing. Conclusion: When everything is done, you can click "Open" button to get the generated files. Now, you can enjoy editing WX500 XAVC S files in Premiere Pro CC/CS flawlessly. More Adobe Premiere Tips: Premiere CC + MXF: MXF to Premiere Pro CC import fails on Mac Edit Samsung NX1 H.265 in Premiere Pro CC on Mac Yosemite Import M-JPEG .AVI files into Premiere Pro CS6? No Audio when Editing MTS files in Adobe Premiere Pro CC? MTS and Premiere Elements workflow Import FCP 7 Projects to Premiere Pro CC on Mac Import Sony XAVC MXF to Premiere Pro CC on Mac Yosemite Import Alpha 77 Mark II AVCHD to Premiere Pro How to Import TS Files to Premiere Pro CC on Mac? JVC 4K Videos Workflows with After Effects CC/CS6 on Windows/Mac Good News! Pavtube Bundles Dealsare coming! If you want to import/preserve/mix multi-track MXF in MKV/MP4/MOV formats, get multi-track Apple Prores MOV for further editing in Final Cut Pro (X), the following bundled software is your best choice:? --------Video Converter($35) + MXF MultiMixer($45) = $54.9, Save $25.1 (buy link) --------Video Converter for Mac($35) + iMixMXF($45) = $54.9, Save $25.1 (buy link) Go ahead and click the link to get your coupon. Save up to $44.1!Never miss!!! Source: http://handycameratips.jimdo.com/2015/05/13/convert-xavc-s-to-mpeg-2-for-premiere/
H.265 Codec Encoder: Encode NX500 H.265 to ProRes for FCP X
Overview:
By googling, I found most Samsung NX500 users have encountered the recorded H.265 file to FCP X importing issue. The main reason is that NX500's recording H.265 codec are not native codec for FCP X. The guide will show you How to edit Samsung NX500 H.265 with FCP X natively.
"HELP! I just received a new Samsung NX500 camera. This camera is capable of 4K video recording, but when I try to open the files with Final Cut Pro X or Quicktime, it says they are not compatible. The file is H.265 codec MP4 format. I've tried converting the files to other formats, but it's just not allowing me to open it up. Does anyone else have experience with this camera yet? I know the NX1 saves in the same format and I'm finding that may people have had trouble with that as well.
Thank you,
Rob - Designs4Times
MacBook Pro with Retina display, OS X Yosemite (10.10.2)"
 The Samsung NX500 uses the same h.265 codec that is used by the Samsung NX-1 which I recently purchased. Neither Mac OS X or Windows is yet able to natively play back this codec. There is an editor (Power Director 13 from Cyberlink) running under Windows only that will import and edit the H.265 codec. However, playback in Windows on my fully maxed out Mac pro (Late 2013) is not very good and therefore it is difficult to precisely edit using PD13. I have found the best solution to edit H.265 codec in Final Cut Pro X is to convert the H.265 codec into Apple ProRes 422 codec using the cheap and excellentPavtube HD Video Converter for Mac. You can find this by Googling it. This app makes full use of all cores on my Late 2013 Mac Pro and produces an excellent transcoding any HD Videos to ProRes 422 at very high speed. Besides, the built-in video editor allows you to modify your videos by trimming, cropping, adjusting video effects and more. (Top 5 Best H.265/HEVC Codec Decoding and Encoding Tools on PC/Mac)
Read on to find out a quick guide on how to rewrap Samsung NX500 4K H.265/HEVC codec to ProRes 422 for editing in FCP X with optimum performance.
First of all, download, install and run the professional H.265 to FCP X Converter on your Mac Yosemite 10.10.2:
Other Download:
Steps on converting Samsung NX500 H.265 to ProRes MOV for FCP X
Step 1. Launch the program and click "Add" button to import the Samsung NX500 H.265 files to the program. Batch conversion is supported.
The Samsung NX500 uses the same h.265 codec that is used by the Samsung NX-1 which I recently purchased. Neither Mac OS X or Windows is yet able to natively play back this codec. There is an editor (Power Director 13 from Cyberlink) running under Windows only that will import and edit the H.265 codec. However, playback in Windows on my fully maxed out Mac pro (Late 2013) is not very good and therefore it is difficult to precisely edit using PD13. I have found the best solution to edit H.265 codec in Final Cut Pro X is to convert the H.265 codec into Apple ProRes 422 codec using the cheap and excellentPavtube HD Video Converter for Mac. You can find this by Googling it. This app makes full use of all cores on my Late 2013 Mac Pro and produces an excellent transcoding any HD Videos to ProRes 422 at very high speed. Besides, the built-in video editor allows you to modify your videos by trimming, cropping, adjusting video effects and more. (Top 5 Best H.265/HEVC Codec Decoding and Encoding Tools on PC/Mac)
Read on to find out a quick guide on how to rewrap Samsung NX500 4K H.265/HEVC codec to ProRes 422 for editing in FCP X with optimum performance.
First of all, download, install and run the professional H.265 to FCP X Converter on your Mac Yosemite 10.10.2:
Other Download:
Steps on converting Samsung NX500 H.265 to ProRes MOV for FCP X
Step 1. Launch the program and click "Add" button to import the Samsung NX500 H.265 files to the program. Batch conversion is supported.
 Step 2. Select "Apple ProRes 422 (*.mov)" as output format for opening with FCP X.
From the "Format" list, move to "Final Cut Pro" catalogue, and select "Apple ProRes 422 (*.mov)" as target format. Apple ProRes is the best suited editing codec for FCP X.
Step 3. Adjust video and audio settings (for advanced users)
If necessary, you can click "Settings" button and go to "Profiles Settings" panel to modify video and audio settings like video encoder, resolution, video bit rate, frame rate, aspect ratio, audio encoder, sample rate, audio bit rate, and audio channels.
Go back to the main interface and click the icon "Convert", we can easily make the work done. Then just follow the FCP X transferring tips, it would be nice to edit Samsung NX500 H.265 codec in FCP X.
More H.265 Tips:
Good News: Never miss to get Saving up to $44.1, MXF/MTS/M2TS/MKV/FLV/MOV Converter.etc at Pavtube Bundles Deals, such as: HD Video Converter for Mac($35) + DVD Creator for Mac($35) = $39.9, Save $30.1
Source: http://mediaconverting.blogspot.com/2015/05/import-nx500-h.265-to-fcp-x.html
Step 2. Select "Apple ProRes 422 (*.mov)" as output format for opening with FCP X.
From the "Format" list, move to "Final Cut Pro" catalogue, and select "Apple ProRes 422 (*.mov)" as target format. Apple ProRes is the best suited editing codec for FCP X.
Step 3. Adjust video and audio settings (for advanced users)
If necessary, you can click "Settings" button and go to "Profiles Settings" panel to modify video and audio settings like video encoder, resolution, video bit rate, frame rate, aspect ratio, audio encoder, sample rate, audio bit rate, and audio channels.
Go back to the main interface and click the icon "Convert", we can easily make the work done. Then just follow the FCP X transferring tips, it would be nice to edit Samsung NX500 H.265 codec in FCP X.
More H.265 Tips:
Good News: Never miss to get Saving up to $44.1, MXF/MTS/M2TS/MKV/FLV/MOV Converter.etc at Pavtube Bundles Deals, such as: HD Video Converter for Mac($35) + DVD Creator for Mac($35) = $39.9, Save $30.1
Source: http://mediaconverting.blogspot.com/2015/05/import-nx500-h.265-to-fcp-x.html
Pavtube post how to import MP4 into FCP X on Yosemite Overview: "As to MP4, even if FCPX plays it, it just isn't a codec designed for editing. FCP X is built around ProRes and my advice is always to convert MP4 to FCP X ProRes before editing, even the other formats natively supported, as it just improves performance and saves headaches in the long run." The below are issues about importing MP4 to FCP X on Mac: Q1: "I need to convert a 2.7k mp4 from a GoPro Hero 3 at 45mb/s to ProRes so I can edit in Final Cut 7. Which software I can use and how can I convert and keep the 45mb/s bit rate??" Q2: "I've been searching for a solution but everything I've found relating to this doesn't work for me. I have an MP4 (with AVC Coding, 640 x 360, Millions AAC, Stereo (L R), 48.000 kHz) that I need to edit in FCP 7.0.3. I always get a message that says "Error: can't prepare the movie." I've tried several different codecs to no avail (Intermediate, DV NTSC, etc.) Any ideas on any other ways to get this converted to an editable format? Thanks!" Q3: "Hi, I need a tool that can help me to import MP4 footage to Final Cut Pro X for editing, the MP4 files are recorded by Sony camcorder which I bought several days ago, the videos are XAVC-S MP4 files, I was told that FCP X native supported codec is Apple ProRes codec, will this codec help me? Please give me some suggestions on the way to import MP4 to Final Cut Pro X, thanks for your time."  Why can't import MP4 to Final Cut Pro X natively o Yosemite? In fact, MP4 is a final delivery file type, and is heavily compressed. You need to change the file extentsion from ".mp4" to "a codec" that FCP X can read more easily (without rendering basically). The codec is Apple ProRes, which ensures maximum editing quality and efficiency when working with Final Cut Pro X. Tips: If you meet any importing & editing problems with kinds of popular videos on FCP X, you can link to FCP X Tips and Tricks colum to get the solution. How to Import MP4 into Final Cut Pro X Successfully? In order to solve can't import MP4 to Final Cut Pro X issue and successfully import various MP4 files to FCP X or FCP 7/6, a recommended solution is to convert MP4 to Final Cut Pro X more compatible video format like Apple ProRes or DV, Pavtube HD Video Converter for Mac is an easy-to-use yet professional app to achieve your goal smoothly. Pavtube HD Video Converter for Mac is an outstanding video conversion tool for Mac OS X users. With it, you can convert batches of MP4 video files to FCP X compatible format - Apple ProRes. Besides MP4, it can also transcode more video file formats like H.264/HEVC, XAVC, MTS, MXF, MPEG, AVI, MKV, FLV, Tivo, MOD, VOB, etc. to Final Cut Pro X most compatible Apple ProRes .mov without any quality loss. Due to the newest technology, its conversion process can save you a lot of time. In addition, you can enjoy the quality as the original one and the wonderful quality is spotless and beyond your expectation. The user-friendly interface can make you use it masterly without the complicated process. In a very short time, you will become an expert on operating the program. Moreover, you'll find no difficulty importing HD videos(including H.265/HEVC and XAVC .mxf video) to NLE such as FCP X, FCP 6/7, FCE, iMovie, Apple Aperture 3, Avid Media Composer, Adobe Premiere Pro CC, Premiere Pro CS6/5/4/3, After Effects CC, After Effects CS6, Premiere Elements 13/12, Creative Suite 6/5, DaVinci Resolve, iPhoto, Kdenlive, Keynote, for Pavtube HD Video Converter for Mac can output videos Apple ProRes, AIC, DNxHD, DVCPRO, DV, MPEG-2, AVI, WMV, MOV, VOB, H.265, H.265/HEVC, MPEG-4, and so on. Now just download its free trail version and follow the below guide to convert .MP4 files to edit in Final Cut Pro X or FCP 7/6 smoothly. Other Download:
How to Convert and Import MP4 to Final Cut Pro X on Mac OS X? Step 1. Load MP4 files to the program Launch the Mac MP4 to FCP X Converter and click "Add File" button to locate the .mp4 file(s) you want to add. Check the "Merge into one file" box, you can join several .mp4 clips together if necessary.
Why can't import MP4 to Final Cut Pro X natively o Yosemite? In fact, MP4 is a final delivery file type, and is heavily compressed. You need to change the file extentsion from ".mp4" to "a codec" that FCP X can read more easily (without rendering basically). The codec is Apple ProRes, which ensures maximum editing quality and efficiency when working with Final Cut Pro X. Tips: If you meet any importing & editing problems with kinds of popular videos on FCP X, you can link to FCP X Tips and Tricks colum to get the solution. How to Import MP4 into Final Cut Pro X Successfully? In order to solve can't import MP4 to Final Cut Pro X issue and successfully import various MP4 files to FCP X or FCP 7/6, a recommended solution is to convert MP4 to Final Cut Pro X more compatible video format like Apple ProRes or DV, Pavtube HD Video Converter for Mac is an easy-to-use yet professional app to achieve your goal smoothly. Pavtube HD Video Converter for Mac is an outstanding video conversion tool for Mac OS X users. With it, you can convert batches of MP4 video files to FCP X compatible format - Apple ProRes. Besides MP4, it can also transcode more video file formats like H.264/HEVC, XAVC, MTS, MXF, MPEG, AVI, MKV, FLV, Tivo, MOD, VOB, etc. to Final Cut Pro X most compatible Apple ProRes .mov without any quality loss. Due to the newest technology, its conversion process can save you a lot of time. In addition, you can enjoy the quality as the original one and the wonderful quality is spotless and beyond your expectation. The user-friendly interface can make you use it masterly without the complicated process. In a very short time, you will become an expert on operating the program. Moreover, you'll find no difficulty importing HD videos(including H.265/HEVC and XAVC .mxf video) to NLE such as FCP X, FCP 6/7, FCE, iMovie, Apple Aperture 3, Avid Media Composer, Adobe Premiere Pro CC, Premiere Pro CS6/5/4/3, After Effects CC, After Effects CS6, Premiere Elements 13/12, Creative Suite 6/5, DaVinci Resolve, iPhoto, Kdenlive, Keynote, for Pavtube HD Video Converter for Mac can output videos Apple ProRes, AIC, DNxHD, DVCPRO, DV, MPEG-2, AVI, WMV, MOV, VOB, H.265, H.265/HEVC, MPEG-4, and so on. Now just download its free trail version and follow the below guide to convert .MP4 files to edit in Final Cut Pro X or FCP 7/6 smoothly. Other Download:
How to Convert and Import MP4 to Final Cut Pro X on Mac OS X? Step 1. Load MP4 files to the program Launch the Mac MP4 to FCP X Converter and click "Add File" button to locate the .mp4 file(s) you want to add. Check the "Merge into one file" box, you can join several .mp4 clips together if necessary. 
Step 2. Select Apple ProRes as output format for FCP X When it comes to choosing the output format for these target videos, you directly one choose "Final Cut Pro" preset. For compression, Apple ProRes 422 will do fine for keeping the original MP4 quality the same and creating a Final Cut friendly file format. Apple has made a few variations to the ProRes family - use ProRes 422(Proxy) or (LT) for smaller file sizes(Applied to FCP 7 and above version).  Step 3. (optional): Adjust the video, audio settings Click "Settings" to fix the frame rate, bitrate, video size, etc to your needs. If you want to edit in Final Cut without having to render the clips while editing, all the frame sizes must be the same as the sequence settings. You can save a lot of render time by making all the clips the same size with this Mac MP4 converter. Step 4. Finish converting MP4 to FCP X ProRes format Click the "Convert" button at the bottom-right corner to start and finish the MP4 to Apple ProRes format conversion on Mac. After finish converting MP4 to Final Cut Pro X video, simply import the converted MP4 files to Final Cut Pro X for editing. And you will never be bothered by the following Final Cut Pro X MP4 troubleshooting: 1). I am having trouble importing an .mp4 video I ripped off a DVD file to Final Cut Pro X for editing. 2). I have a Gopro Hero 3 witch records video in MP4 format, when I try to import the recorded MP4 to Final Cut Pro X only to be noticed "File error". 3). When I try to import the recorded MP4 clips from the Samsung H200 SD card to Final Cut Pro X, they appear in FCP X as a black clip with audio only. 4). I like to edit the MP4 file created by Vimeo in FCP. However, whenever I try to import the MP4 video, I'm getting "general error" and it's not importing. 5). Though I use MPEG Streamclip to convert MP4 to Final Cut Pro supported DV, the converted file still fail to import into FCP X. That's all. Thanks for reading. Pavtube HD Video Converter for Mac more guides:
Good News: Never miss to get Saving up to $44.1, MXF/MTS/M2TS/MKV/FLV/MOV Converter.etc at Pavtube Bundles Deals, such as: HD Video Converter for Mac($35) + DVD Creator for Mac($35) = $39.9, Save $30.1 Source: http://handycameratips.jimdo.com/2014/08/28/best-way-to-convert-mp4-files-to-apple-prores/
Step 3. (optional): Adjust the video, audio settings Click "Settings" to fix the frame rate, bitrate, video size, etc to your needs. If you want to edit in Final Cut without having to render the clips while editing, all the frame sizes must be the same as the sequence settings. You can save a lot of render time by making all the clips the same size with this Mac MP4 converter. Step 4. Finish converting MP4 to FCP X ProRes format Click the "Convert" button at the bottom-right corner to start and finish the MP4 to Apple ProRes format conversion on Mac. After finish converting MP4 to Final Cut Pro X video, simply import the converted MP4 files to Final Cut Pro X for editing. And you will never be bothered by the following Final Cut Pro X MP4 troubleshooting: 1). I am having trouble importing an .mp4 video I ripped off a DVD file to Final Cut Pro X for editing. 2). I have a Gopro Hero 3 witch records video in MP4 format, when I try to import the recorded MP4 to Final Cut Pro X only to be noticed "File error". 3). When I try to import the recorded MP4 clips from the Samsung H200 SD card to Final Cut Pro X, they appear in FCP X as a black clip with audio only. 4). I like to edit the MP4 file created by Vimeo in FCP. However, whenever I try to import the MP4 video, I'm getting "general error" and it's not importing. 5). Though I use MPEG Streamclip to convert MP4 to Final Cut Pro supported DV, the converted file still fail to import into FCP X. That's all. Thanks for reading. Pavtube HD Video Converter for Mac more guides:
Good News: Never miss to get Saving up to $44.1, MXF/MTS/M2TS/MKV/FLV/MOV Converter.etc at Pavtube Bundles Deals, such as: HD Video Converter for Mac($35) + DVD Creator for Mac($35) = $39.9, Save $30.1 Source: http://handycameratips.jimdo.com/2014/08/28/best-way-to-convert-mp4-files-to-apple-prores/
Sony PXW-X70 XAVC MXF and FCP X compatibility on Yosemite Overview: If you are now frustrating about how to import Sony PXW-X70 XAVC MXF file to FCP X on Mac Yosemite 10.10, you can read this tutorial and find the ultimate solution to convert XAVC .MXF to FCP X compatible format - Apple ProRes mov.  Whatever for Mac users or Windows users, some popular editing software may be taken as good assistants if you are a professional video editor. As Windows users have Sony Vegas, Mac users always take the Final Cut Pro X/7/6 as their favorite. With hundreds of features worthy of listing, some problems or unwanted gaps may appear when editing. For example, Sony PXW-X70 XAVC MXF files to FCP X importing issues. "I want to edit my Sony PXW-X70 XAVC .mxf files in FCP X without rendering, what should I do? And I take much time on importing MXF video in XAVC codec into FCP X on Mac. The process is a pain in the neck..." "I have purchased Sony PXW-X70 camcorder last week. Since I got it I always take it when I go traveling. I have recorded several 1080p videos with Sony PXW-X70 and the recordings are in two video formats. One is XAVC and another is AVCHD, when I try to import the XAVC MXF files to FCP X on my MacBook Pro, the FCP X says the video formats are not supported to import, can you help me?" To be frank, recently on some recording forums there are a few of Sony PXW-X70 users complained that FCP X can't recognize the Sony PXW-X70 recorded XAVC MXF files. If you read the detail description of FCP X on Apple official website, you will get the info that Apple ProRes codec is the native codec for FCP X. Once you convert Sony PXW-X70 XAVC MXF files to FCP X best accepted Apple ProRes codec, your importing and editing problem will be solved. Here we recommend you to take a free try on Pavtube MXF Converter for Mac (Review), which is an all-in-one Converter to convert XAVC .mxf to FCP X supported Apple ProRes codec, this is powerful software that it can convert MXF, P2 MXF, XDCAM MXF, XAVC MXF to nearly all the HD videos, for example H.265/HEVC, H.264, MOV, AVI, MPEG-2, WMV, MKV, MP4, MPG, VOB, FLV, F4V, SWF, ASF or other files, etc. for editing, playing, burning on Mac. Besides, it has many optimized formats for output, such as Apple ProRes for FCP X, AIC codec for iMovie and FCE, DNxHD codec for Avid Media Composer, MPEG-2 codec for Premiere Pro CC/CS6, MP4 formats for HDTVs, and optimized formats for tablets and smartphones, you can choose according to your need. Now please free download this Mac XAVC MXF to FCP X converter. Other Download:
How to Encode Sony PXW-X70 XAVC MXF to FCP X native ProRes codec on Mac? Step 1. Download and have a quick installation. The trial version will have a watermark on your converted files. Except for that, there are no time limitation, no virus, and no unnecessary bundle apps while downloading. After that, click "Add Video" button to load your XAVC MXF files. You can load several files at once thanks to "Add from folder" button.
Whatever for Mac users or Windows users, some popular editing software may be taken as good assistants if you are a professional video editor. As Windows users have Sony Vegas, Mac users always take the Final Cut Pro X/7/6 as their favorite. With hundreds of features worthy of listing, some problems or unwanted gaps may appear when editing. For example, Sony PXW-X70 XAVC MXF files to FCP X importing issues. "I want to edit my Sony PXW-X70 XAVC .mxf files in FCP X without rendering, what should I do? And I take much time on importing MXF video in XAVC codec into FCP X on Mac. The process is a pain in the neck..." "I have purchased Sony PXW-X70 camcorder last week. Since I got it I always take it when I go traveling. I have recorded several 1080p videos with Sony PXW-X70 and the recordings are in two video formats. One is XAVC and another is AVCHD, when I try to import the XAVC MXF files to FCP X on my MacBook Pro, the FCP X says the video formats are not supported to import, can you help me?" To be frank, recently on some recording forums there are a few of Sony PXW-X70 users complained that FCP X can't recognize the Sony PXW-X70 recorded XAVC MXF files. If you read the detail description of FCP X on Apple official website, you will get the info that Apple ProRes codec is the native codec for FCP X. Once you convert Sony PXW-X70 XAVC MXF files to FCP X best accepted Apple ProRes codec, your importing and editing problem will be solved. Here we recommend you to take a free try on Pavtube MXF Converter for Mac (Review), which is an all-in-one Converter to convert XAVC .mxf to FCP X supported Apple ProRes codec, this is powerful software that it can convert MXF, P2 MXF, XDCAM MXF, XAVC MXF to nearly all the HD videos, for example H.265/HEVC, H.264, MOV, AVI, MPEG-2, WMV, MKV, MP4, MPG, VOB, FLV, F4V, SWF, ASF or other files, etc. for editing, playing, burning on Mac. Besides, it has many optimized formats for output, such as Apple ProRes for FCP X, AIC codec for iMovie and FCE, DNxHD codec for Avid Media Composer, MPEG-2 codec for Premiere Pro CC/CS6, MP4 formats for HDTVs, and optimized formats for tablets and smartphones, you can choose according to your need. Now please free download this Mac XAVC MXF to FCP X converter. Other Download:
How to Encode Sony PXW-X70 XAVC MXF to FCP X native ProRes codec on Mac? Step 1. Download and have a quick installation. The trial version will have a watermark on your converted files. Except for that, there are no time limitation, no virus, and no unnecessary bundle apps while downloading. After that, click "Add Video" button to load your XAVC MXF files. You can load several files at once thanks to "Add from folder" button. 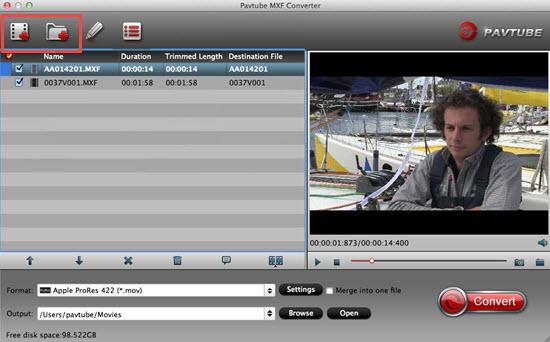 Step 2. Click the "Format" bar to get the drop-down menu and you can get "Final Cut Pro>>Apple ProRes codec", including ProRes 422, ProRes 422 (HQ), ProRes 422 (LT), ProRes 422 (Proxy) and ProRes 4444. Choose the proper one you want. Here, we suggest you to choose "Apple ProRes 422 (*.mov)" as the best output format. Apple ProRes 422 and Apple ProRes 422 (HQ) have higher qualities. Apple ProRes 422 (LT) and Apple ProRes 422 (Proxy) have smaller sizes. You can choose according to your requirement. (Learn more about Types of Apple ProRes Codecs)
  Tips: Some users may encounter the problem that when they try to convert MXF to ProRes for FCP X, Pavtube MXF Converter for Mac just finishes the conversion at about one or two seconds, then generate 0kb files. This may because you don't install the FCP X in your local place, Pavtube MXF Converter for Mac need to use the codec from FCP to do the encoding thing. Step 3: Click "Settings" button to customize the output video and audio settings by yourself. But if you are not good at it, you'd better use the default parameters, they will ensure you a good balance between file size and image quality basically. You can change the resolution, bit rate, frame rate as you need.
  Step 4: When everything is done, you can take a preview by hitting "Play" button. If you are satisfied with the final result, you can click "Convert" button to finish the conversion work. When the conversion is done, you can click "Open" to get your generated files. Now, you can edit XAVC MXF files in FCP X without any hassles on Mac. Good news! If you want to transcode XAVC MXF to multi-track Apple ProRes for editing in FCP X, Pavtube iMixMXF is the best and easiest multi-track MXF Converter on Mac (including Yosemite 10.10 and Mavericks 10.9). iMixMXF Key Features: -Import/preserve/mix multi-track MXF in MKV/MP4/MOV formats. -Output multi-track Apple Prores MOV for further editing in Final Cut Pro (X). -Support DVCPRO/HDV/Avid DNxHD/AIC output -Convert MXF to any other formats for editing, playing, or broadcasting. -Merge/split/trim/crop MXF footages. More MXF Tips:
Good news! Pavtube Bundles Deals are coming! It's a time for taking a break from work and relaxing. And now you can enjoy your colorful time with good featured products at"Pavtube Bundles Deals". Go ahead and click the link to get your coupon. Save up to $44.1!Never miss!!! MTS/M2TS Converter for Mac($29) + MXF Converter for Mac($29) = Only $29.9 Source: http://mxfworld.jimdo.com/mxf-to-fcp-x/
Step 4: When everything is done, you can take a preview by hitting "Play" button. If you are satisfied with the final result, you can click "Convert" button to finish the conversion work. When the conversion is done, you can click "Open" to get your generated files. Now, you can edit XAVC MXF files in FCP X without any hassles on Mac. Good news! If you want to transcode XAVC MXF to multi-track Apple ProRes for editing in FCP X, Pavtube iMixMXF is the best and easiest multi-track MXF Converter on Mac (including Yosemite 10.10 and Mavericks 10.9). iMixMXF Key Features: -Import/preserve/mix multi-track MXF in MKV/MP4/MOV formats. -Output multi-track Apple Prores MOV for further editing in Final Cut Pro (X). -Support DVCPRO/HDV/Avid DNxHD/AIC output -Convert MXF to any other formats for editing, playing, or broadcasting. -Merge/split/trim/crop MXF footages. More MXF Tips:
Good news! Pavtube Bundles Deals are coming! It's a time for taking a break from work and relaxing. And now you can enjoy your colorful time with good featured products at"Pavtube Bundles Deals". Go ahead and click the link to get your coupon. Save up to $44.1!Never miss!!! MTS/M2TS Converter for Mac($29) + MXF Converter for Mac($29) = Only $29.9 Source: http://mxfworld.jimdo.com/mxf-to-fcp-x/
XAVC S to FCP X: Encode Sony HX90V XAVC S for FCP X Overview: Sony XAVC S to FCP X not working? I've figured out an effective way to import XAVC S footage to Final Cut Pro X flawlessly. Share as below.  Sony produces two versions of the HX90, the CyberShot HX90 and the CyberShot HX90V. The only difference between the two models is that the V-version has GPS technology inside whereas the HX90 doesn't. Both versions have Wi-Fi and NFC connectivity built-in and are compatible with some of the apps available via Sony's PlayMemories scheme. Both HX90 and HX90V record Full-HD 8 bit 4:2:0 video footage at up to 50Mbps in AVCHD, MP4 or the new XAVC S format at 50/60p. But you may find that FCP X won't import XAVC S videos from Sony HX90/HX90V smoothly, such as: "I'm using the Sony DSC-HX90V to make a short film and we are shooting XAVC S videos with it. Is there an easy way that allows easy import Sony HX90V XAVC S to Final Cut Pro X directly, without having to use any complex plug-in. I'm seeking for the Sony DSC-HX90V XAVC S to FCP X best workflow." Generally, we can use Log and Transfer or Log and Capture to import videos, images, and etc. to FCP X for editing. But XAVC S codec is a new one, and is not widely supported, including FCP 6/7 and even the latest FCP X. Since, Apple ProRes is the most compatible codec for FCP X/7/6, so if we want to edit Sony HX90/HX90V XAVC S files in FCP X, it's necessary to convert those already shot XAVC S files to ProRes .mov using third-party software. I recommend you to try Pavtube Video Converter for Mac, which is a professional tool for Mac users to transcode XAVC, XAVC S, XAVC L footage to ProRes 422 ensuring maximum editing quality and efficiency when working with FCP X. What's more? It supports encoding XAVC S to more video editing software compatible file types like DNxHD for Avid Media Composer, AIC MOV for iMovie/FCE, MPEG-2 for Adobe Premiere Pro CC and etc. If you are running on Windows, you can turn to the equivalent version- Pavtube Video Converter. P.S. This Mac Video Converter is functional, it can also encode/decode H.265/HEVC videos to FCP X, Premiere Pro CC, After Effects CC, iMovie, DaVinci Resolve Lite as well as YouTube, QuickTime,iTunes, VLC on Mac OS X Yosemite 10.10, 10.9 Mavericks, 10.8 Mountain Lion. How to encode Sony HX90/HX90V XAVC S to ProRes 422 for editing in FCP X? Step 1. Download Mac Video Converter, and follow the prompts to install the program. When the installation is complete, the best HX90/HX90V XAVC S Converter will launch automatically. Other Download:
Step 2. Click "Add video" button to load Sony HX90/HX90V XAVC S recordings or directly drag the files into file list. By default, the files are selected. You can delete files which you don't want to import to.
Sony produces two versions of the HX90, the CyberShot HX90 and the CyberShot HX90V. The only difference between the two models is that the V-version has GPS technology inside whereas the HX90 doesn't. Both versions have Wi-Fi and NFC connectivity built-in and are compatible with some of the apps available via Sony's PlayMemories scheme. Both HX90 and HX90V record Full-HD 8 bit 4:2:0 video footage at up to 50Mbps in AVCHD, MP4 or the new XAVC S format at 50/60p. But you may find that FCP X won't import XAVC S videos from Sony HX90/HX90V smoothly, such as: "I'm using the Sony DSC-HX90V to make a short film and we are shooting XAVC S videos with it. Is there an easy way that allows easy import Sony HX90V XAVC S to Final Cut Pro X directly, without having to use any complex plug-in. I'm seeking for the Sony DSC-HX90V XAVC S to FCP X best workflow." Generally, we can use Log and Transfer or Log and Capture to import videos, images, and etc. to FCP X for editing. But XAVC S codec is a new one, and is not widely supported, including FCP 6/7 and even the latest FCP X. Since, Apple ProRes is the most compatible codec for FCP X/7/6, so if we want to edit Sony HX90/HX90V XAVC S files in FCP X, it's necessary to convert those already shot XAVC S files to ProRes .mov using third-party software. I recommend you to try Pavtube Video Converter for Mac, which is a professional tool for Mac users to transcode XAVC, XAVC S, XAVC L footage to ProRes 422 ensuring maximum editing quality and efficiency when working with FCP X. What's more? It supports encoding XAVC S to more video editing software compatible file types like DNxHD for Avid Media Composer, AIC MOV for iMovie/FCE, MPEG-2 for Adobe Premiere Pro CC and etc. If you are running on Windows, you can turn to the equivalent version- Pavtube Video Converter. P.S. This Mac Video Converter is functional, it can also encode/decode H.265/HEVC videos to FCP X, Premiere Pro CC, After Effects CC, iMovie, DaVinci Resolve Lite as well as YouTube, QuickTime,iTunes, VLC on Mac OS X Yosemite 10.10, 10.9 Mavericks, 10.8 Mountain Lion. How to encode Sony HX90/HX90V XAVC S to ProRes 422 for editing in FCP X? Step 1. Download Mac Video Converter, and follow the prompts to install the program. When the installation is complete, the best HX90/HX90V XAVC S Converter will launch automatically. Other Download:
Step 2. Click "Add video" button to load Sony HX90/HX90V XAVC S recordings or directly drag the files into file list. By default, the files are selected. You can delete files which you don't want to import to.  Step 3. Click "Format" bar to determine output format. For best image quality, click the format bar and choose "Final Cut Pro -> Apple ProRes 422 (*.mov)" as output format for editing HX90/HX90V XAVC S in FCP X.
  Step 4. Click "Settings" button to customize the output video and audio settings by yourself. But if you are not good at it, you'd better use the default parameters, they will ensure you a good balance between file size and image quality basically. You can change the resolution, bit rate, frame rate as you need. Step 5. You can preview to check the final result. Once you are satisfied with it, click the "Convert" button to start converting Sony HX90/HX90V XAVC S to ProRes 422 for editing in FCP X flawlessly. It will take you a little while. Conclusion: Once the conversion process is complete, you can click "Open Folder" button to get the generated files for editing HX90/HX90V XAVC S in FCP X with optimum performance. Let's have a try! Pavtube Video Converter for Mac More Tips:
Good News! Pavtube Bundles Dealsare coming! If you want to import/preserve/mix multi-track MXF in MKV/MP4/MOV formats, get multi-track Apple Prores MOV for further editing in Final Cut Pro (X), the following bundled software is your best choice:? --------Video Converter($35) + MXF MultiMixer($45) = $54.9, Save $25.1 (buy link) --------Video Converter for Mac($35) + iMixMXF($45) = $54.9, Save $25.1 (buy link) Go ahead and click the link to get your coupon. Save up to $44.1!Never miss!!! Surce: http://handycameratips.jimdo.com/2015/05/20/convert-xavc-s-to-fcp-x/
Step 4. Click "Settings" button to customize the output video and audio settings by yourself. But if you are not good at it, you'd better use the default parameters, they will ensure you a good balance between file size and image quality basically. You can change the resolution, bit rate, frame rate as you need. Step 5. You can preview to check the final result. Once you are satisfied with it, click the "Convert" button to start converting Sony HX90/HX90V XAVC S to ProRes 422 for editing in FCP X flawlessly. It will take you a little while. Conclusion: Once the conversion process is complete, you can click "Open Folder" button to get the generated files for editing HX90/HX90V XAVC S in FCP X with optimum performance. Let's have a try! Pavtube Video Converter for Mac More Tips:
Good News! Pavtube Bundles Dealsare coming! If you want to import/preserve/mix multi-track MXF in MKV/MP4/MOV formats, get multi-track Apple Prores MOV for further editing in Final Cut Pro (X), the following bundled software is your best choice:? --------Video Converter($35) + MXF MultiMixer($45) = $54.9, Save $25.1 (buy link) --------Video Converter for Mac($35) + iMixMXF($45) = $54.9, Save $25.1 (buy link) Go ahead and click the link to get your coupon. Save up to $44.1!Never miss!!! Surce: http://handycameratips.jimdo.com/2015/05/20/convert-xavc-s-to-fcp-x/
Edit XC10 XF-AVC 4K MXF in Aperture 3/Premiere Elements
Have interests in editing Canon XC10 XF-AVC 4K MXF in Aperture 3/Premiere Elements for sharing? That's exactly an awesome idea! But do you know the best video codec of Aperture 3/Premiere Elements for editing? If not, you may get some troubles there.  What's new with this latest Canon 4K camcorder? Why we need to convert the MXF files for editing in Aperture 3/Premiere Elements? Well, Canon XC10 is a very hot camcorder on the market now and a lot of users choose to buy this excellent camcorder. It is a new camcorder with 4K internal video recording, which is aimed at beginners and semi-professionals who would want to upgrade to shooting 4K video without spending the big bucks for it. Frankly speaking, as the latest Canon 4K camcorder that attracts videographers' attention, this Canon XC10 AVC brings us the higher image quality with the flexible operations. It delivers enhanced workflows across various stages of the production process, from shooting to editing. While as we often mentioned, as the incompatible one, MXF cannot be one of the best supported video formats no matter for Aperture 3 or Premiere Elements. What's more? You may also have encountered incompatible issues when you want to upload MXF files to YouTube for sharing, import MXF to QuickTime for playing, stream MXF to Sony Vegas for editing. With the unsupported output formats or with some other incompatible operations, it seems not strange that we will meet some related issues when adding XC10 XF-AVC 4K MXF files to Aperture 3/Premiere Elements, right? In this case, for the purpose of converting 4K MXF and considering the ease of use and lossless quality, we highly recommend the Pavtube MXF Converter for Mac to have a try.
 Step by step on how to edit XC10 XF-AVC 4K MXF in Aperture 3/Premiere Elements: Step 1: Download Mac MXF Converter, and follow the prompts to install the program. When the installation is complete, the best XC10 XF-AVC 4K MXF Converter will launch automatically. Step 2: Click "Add video" button to load Canon XC10 XF-AVC 4K MXF files or directly drag the files into file list. By default, the files are selected. You can delete files which you don't want to import to.
  Step 3: Click "Format" bar to determine output format. For best image quality, click the format bar and choose "Final Cut Pro>>Apple ProRes 422 (*.mov)" as output format for editing XC10 XF-AVC 4K MXF in Aperture 3. Tips: Equally, click the format bar and choose "Adobe Premiere/Sony Vegas>>MPEG-2 (*.mpg)" as output format for editing XC10 XF-AVC 4K MXF in Premiere Elements.
  Step 4: Click "Settings" button to customize the output video and audio settings by yourself. But if you are not good at it, you'd better use the default parameters, they will ensure you a good balance between file size and image quality basically. You can change the resolution, bit rate, frame rate as you need. Step 5: You can preview to check the final result. Once you are satisfied with it, click the "Convert" button to start converting Canon XC10 XF-AVC 4K MXF for editing in Aperture 3/Premiere Elements flawlessly. It will take you a little while. Conclusion: Once the conversion process is complete, you can click "Open Folder" button to get the generated files for editing XC10 XF-AVC 4K MXF in Aperture 3/Premiere Elements with optimum performance. Let's have a try! Further Reading: How to Play MKV, AVI, VOB, FLV, WMV on Google Nexus 6/9?: Google Nexus 6 or Nexus 9 cannot play HD videos such as MKV, AVI, VOB, FLV, and WMV for both of them have limited supported video formats. Convert Panasonic AJ-HPX2700 P2 MXF to Avid/Premiere/Sony Vegas Pro: If you indeed meet issues of converting and importing Panasonic AJ-HPX2700 P2 MXF files for editing in Avid, Premiere Pro and Sony Vegas Pro, let's together learn some P2 MXF workflow. No Sound on Playing MKV Files on Gear VR? Solved!: Any issues there when importing MKV files to Gear VR for enjoying at home? No more worries about watching 3D MKV movies on Gear VR if you read this guide carefully. Windows H.265/HEVC Decoder and Encoder Review GoPro Video Plays Troubles with Plex—How to Solve? Upload Sony PMW 300K1 Footage to Youtube/Vimeo/Facebook Never miss to get Saving up to $44.1, MXF/MTS/M2TS/MKV/FLV/MOV Converter.etc at Pavtube Bundles Deals!
AVCHD to FCP X Conversion, TZ70AVCHD to FCP X Workflow
Panasonic Lumix TZ70 AVCHD can’t be imported to FCP X. Are you seeking to AVCHD to FCP X workflow to convert AVCHD to FCP X? Check the AVCHD to FCP X solutions which are available below right now!
 Unveiled at CES 2015, Panasonic Lumix TZ70 is a super zoom camera which you can fit into your coat pocket. The shooting mode is of course AVCHD, which is a file-based format for the digital recording and playback of high-definition video. For many NLEs like FCP X, this AVCHD may not such friendly one. So is there any solution to import TZ70 AVCHD to FCP X for editing?
FCP X works well with AVCHD. It actually converts AVCHD to FCP X friendly format in the background to increase performance. However, you need to make sure you preserve the original file structure. Copy the whole card just as it is, onto your drive. Then from within the FCP X import window, navigate to the folder, and voila, you'll see the video clips and be able to import then as normal. That means in essence you will be duplicating your footage.
This was a pain for most uses. If you do have more time on your hands, you might consider converting TZ70 AVCHD to FCP X supported Apple ProRes directly using a program like Pavtube MTS/M2TS Converter for Mac. With it, you can effortlessly encode AVCHD MTS footage for smoothly importing and editing in various non-linear editing systems including FCP X.
Workflow to import TZ70 AVCHD to FCP X for editing:
Step 1: Connect your Lumix TZ70 camcorder to Mac via USB cable and find the AVCHD files from the camera folder. Then copy and transfer the AVCHD files from TZ70 to the Apple hard drive disk.
Step 2: Import TZ70 AVCHD files to Mac MTS Converter. Run it as the best MTS Converter, and click the "Add video" button to load AVCHD MTS videos. You may also directly drag and drop TZ70 AVCHD MTS videos to application UI for importing files.
Unveiled at CES 2015, Panasonic Lumix TZ70 is a super zoom camera which you can fit into your coat pocket. The shooting mode is of course AVCHD, which is a file-based format for the digital recording and playback of high-definition video. For many NLEs like FCP X, this AVCHD may not such friendly one. So is there any solution to import TZ70 AVCHD to FCP X for editing?
FCP X works well with AVCHD. It actually converts AVCHD to FCP X friendly format in the background to increase performance. However, you need to make sure you preserve the original file structure. Copy the whole card just as it is, onto your drive. Then from within the FCP X import window, navigate to the folder, and voila, you'll see the video clips and be able to import then as normal. That means in essence you will be duplicating your footage.
This was a pain for most uses. If you do have more time on your hands, you might consider converting TZ70 AVCHD to FCP X supported Apple ProRes directly using a program like Pavtube MTS/M2TS Converter for Mac. With it, you can effortlessly encode AVCHD MTS footage for smoothly importing and editing in various non-linear editing systems including FCP X.
Workflow to import TZ70 AVCHD to FCP X for editing:
Step 1: Connect your Lumix TZ70 camcorder to Mac via USB cable and find the AVCHD files from the camera folder. Then copy and transfer the AVCHD files from TZ70 to the Apple hard drive disk.
Step 2: Import TZ70 AVCHD files to Mac MTS Converter. Run it as the best MTS Converter, and click the "Add video" button to load AVCHD MTS videos. You may also directly drag and drop TZ70 AVCHD MTS videos to application UI for importing files.
 Step 3: Click the "Format" option and navigate the mouse cursor to "Final Cut Pro >>Apple ProRes 422 (*.mov)" as output format. Apple ProRes 422 (*.mov) and Apple ProRes 422 (HQ) (*.mov) have higher qualities. Apple ProRes 422 (LT) (*.mov) and Apple ProRes 422 (Proxy) (*.mov) have smaller size. You can choose according to your requirement.
Step 4: To set the profile settings, please click the "Settings" button. General speaking, the default settings are just fine. Click the "Browse" button to browse and specify a destination folder to save the converted files.
Step 5: When everything is ready, click "Convert" to start converting AVCHD MTS to ProRes 422. This Mac MTS/M2TS Converter supports batch conversion so you may load multiple files and convert them at one time.
Conclusion: As AVCHD MTS to Apple ProRes 422 Mac video converter, it enables you to trim out unwanted part, crop out black bars, change aspect ratio from 4:3 to 16:9 and vice versa, rotate 90 degrees clockwise, anti-clockwise, add plug-in subtitles, apply special effect, and more. Now, you can import TZ70 AVCHD to FCP X without any hassles.
Further Reading:
How to Play MKV Files on Samsung Galaxy S6/S6 Edge?: How to watch MKV files on Samsung S5/S6 Edge will be a big problem for new users who just can't wait to have this wonder handset for a try.
How to Edit Fraps recorded files with FCP, Premiere, Avid on Mac?: Scratching your head to find a doable program to make Fraps footage compatible with FCP, Premiere, Avid and other NLEs for smooth editing?
Play AVCHD Videos with VLC and QuickTime on Yosemite: There are exactly some top issues appeared when you wanna import AVCHD videos to VLC media player and QuickTime on Yosemite for a playback.
From Blackmagic 4K to ProRes and DNxHD? Blackmagic Video Converter
Ingest H.265 Films to WDTV Live on Windows PC
Good news! Pavtube Bundles Deals are coming! It's a time for taking a break from work and relaxing. And now you can enjoy your colorful time with good featured products at"Pavtube Bundles Deals". Go ahead and click the link to get your coupon. Save up to $44.1!Never miss!!!
Step 3: Click the "Format" option and navigate the mouse cursor to "Final Cut Pro >>Apple ProRes 422 (*.mov)" as output format. Apple ProRes 422 (*.mov) and Apple ProRes 422 (HQ) (*.mov) have higher qualities. Apple ProRes 422 (LT) (*.mov) and Apple ProRes 422 (Proxy) (*.mov) have smaller size. You can choose according to your requirement.
Step 4: To set the profile settings, please click the "Settings" button. General speaking, the default settings are just fine. Click the "Browse" button to browse and specify a destination folder to save the converted files.
Step 5: When everything is ready, click "Convert" to start converting AVCHD MTS to ProRes 422. This Mac MTS/M2TS Converter supports batch conversion so you may load multiple files and convert them at one time.
Conclusion: As AVCHD MTS to Apple ProRes 422 Mac video converter, it enables you to trim out unwanted part, crop out black bars, change aspect ratio from 4:3 to 16:9 and vice versa, rotate 90 degrees clockwise, anti-clockwise, add plug-in subtitles, apply special effect, and more. Now, you can import TZ70 AVCHD to FCP X without any hassles.
Further Reading:
How to Play MKV Files on Samsung Galaxy S6/S6 Edge?: How to watch MKV files on Samsung S5/S6 Edge will be a big problem for new users who just can't wait to have this wonder handset for a try.
How to Edit Fraps recorded files with FCP, Premiere, Avid on Mac?: Scratching your head to find a doable program to make Fraps footage compatible with FCP, Premiere, Avid and other NLEs for smooth editing?
Play AVCHD Videos with VLC and QuickTime on Yosemite: There are exactly some top issues appeared when you wanna import AVCHD videos to VLC media player and QuickTime on Yosemite for a playback.
From Blackmagic 4K to ProRes and DNxHD? Blackmagic Video Converter
Ingest H.265 Films to WDTV Live on Windows PC
Good news! Pavtube Bundles Deals are coming! It's a time for taking a break from work and relaxing. And now you can enjoy your colorful time with good featured products at"Pavtube Bundles Deals". Go ahead and click the link to get your coupon. Save up to $44.1!Never miss!!!
- MTS/M2TS Converter for Mac($29) + MXF Converter for Mac($29) = Only $29.9
- MTS/M2TS Converter for Mac($29) + MKV Converter for Mac($29) = Only $29.9
- MTS/M2TS Converter for Mac($29) + FLV/F4V Converter for Mac($29) = Only $29.9
- iMixMXF($45) + HD Video Converter for Mac($35) = Only $54.9 .....