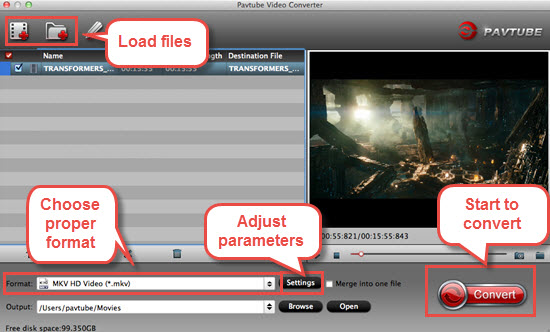
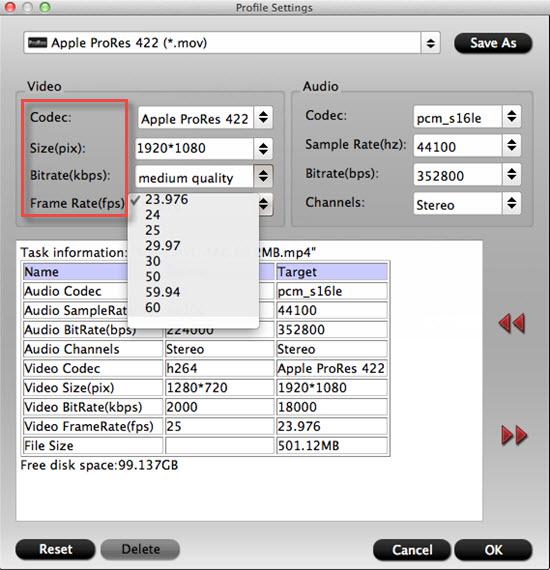
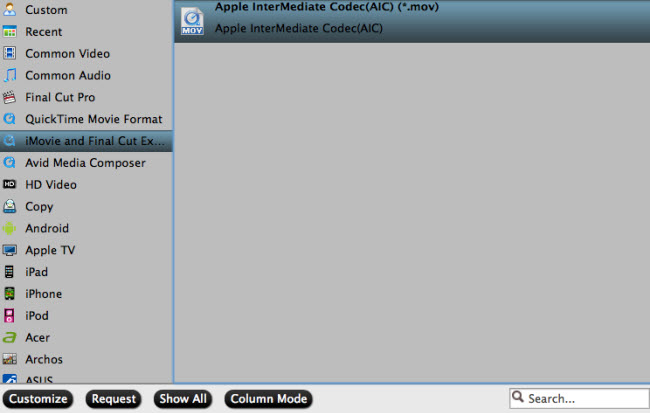
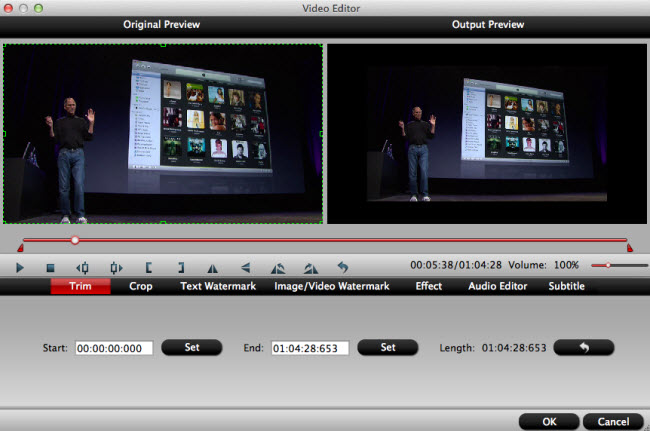
Pavtube Software, the industry leader in the field of Blu-ray & DVD backup and HD/4K/3D Video solutions, rolls out its Spring Promotion of 2016 on Facebook, offering up to a 78% deep discount on many of its hot selling Video products and up to 50% deep discount on many of its hot selling Blu-ray/DVD products, including No.1 bestseller ByteCopy, No.2 bestseller Video Converter Ultimate... as a gift. Pavtube Software could be everything a movie lover may need to back up their physical DVD and Blu-ray discs, convert them into on-demand formats for enjoying on the move.
Giveaway: First Five customers can share this page to your timeline, email us your order numer and the snapshot to win one more FREE license, no product limit!
If you have any problem to buy or use Pavtube, pls feel free to contact support@pavtube.com or
macsupport@pavtube.com
Note: The main products of Pavtube that improved Blu-ray/DVD ripping & video converting speed with GPU acceleration are BDMagic, ByteCopy, Video Converter Ultimate, DVDAid, Video Converter and so on.
No.1 Bestseller Pavtube HD Video Converter for Windows/Mac - Only $9.9
Key Features
- HD Video Converter + 4K Video Converter + 3D Video Converter + Audio Converter
- Convert All Popular HD Video and Audio Formats
- Support H.265/HEVC Encoding and Decoding
- Support Transcoding HD/4K Videos from all Camcorders & Cameras: Sony, Canon, Panasonic, Samsung, GoPro, Blackmagic, JVC, Nikon, DJI and more
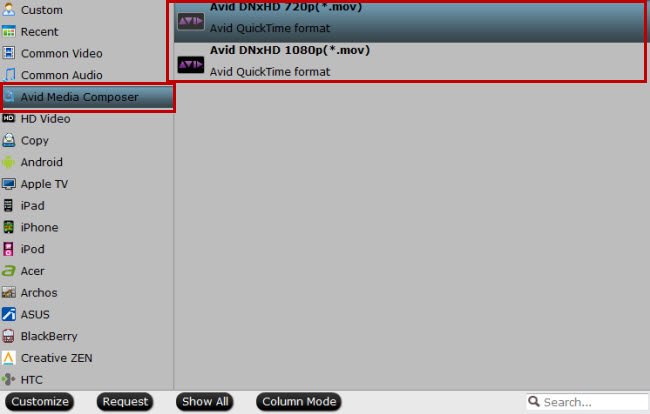
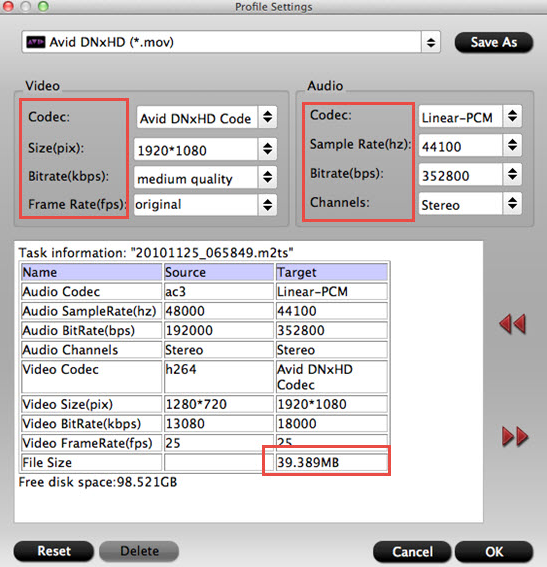
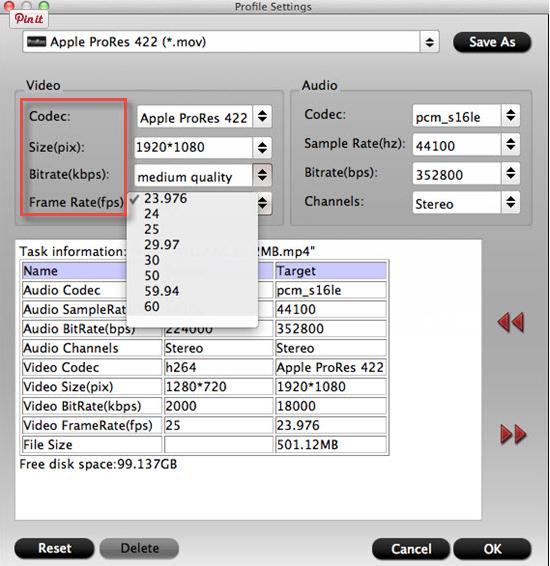
- Export Apple ProRes/DVCPRO/HDV/Avid DNxHD/AIC/MPEG-2 for NLEs
- Support Presets for Almost All Popular Devices, game consoles, media players/servers, TVs, projector, VR headsets and more
- Support Batch Conversion with Fast Speed and Excellent Quality
- Edit Videos through Trimming, Cropping, Adding Watermarks, Insert Subtitles, etc.
- Support adding .srt/.ass/.ssa subtitles into any videos
Pavtube HD Video Converter for Mac Review
Best HD Video Converter Review
Top 5 Best HD Video Converter for Mac Review


No.2 Bestseller Pavtube Video Converter for Windows/Mac - Only $9.9
Key Features
- Convert from and to any common SD/HD/3D/4K video and audio format.
- Support Decoding and Encoding H.265/HEVC and XAVC 4K video
- Support Encode any videos to M3U8 for Apple devices
- 150+ ready presets for iPhone, iPad, Apple TV, Samsung, Google, TV, Surface, PS4, PS3, Xbox, WDTV and other mobile devices
- Support Apple ProRes/DVCPRO/HDV/Avid DNxHD/AIC encoding.
- Output Formats for Windows or Mac editing software, e.g. FCP X, iMovie, FCE, Avid, Adobe Premiere, Eduis Pro, GoPro Studio, WIndows Movie Maker, Sony Vegas Pro...
- 6X faster conversion speed and high output quality
- Support batch conversion - convert multiple files at the same time
- Edit and touch up your video in clicks (e.g. trimming, cropping, inserting SRT/ASS/SSA subtitle, etc)
Top 10 Video Converter Review
Top 4 Video Converter for Mac Review


No.3 Bestseller Pavtube multi-track MXF Converter for Windows/Mac - Only $9.9
Key Features
- Export MXF into MKV, MOV, and MP4 container with multiple audio tracks preserved
- Output multi-track Apple Prores MOV for further editing in Final Cut Pro (X)
- Mix multiple audio tracks/channels in MXF footage into one
- Make MXF files editable in mainstream video editing applications
- Convert MXF to any other formats for editing, playing, or broadcasting
- Convert 2D videos to 3D in MKV, MOV, AVI, MP4, WMV formats
- Support DVCPRO/HDV/Avid DNxHD/AIC output
- Import/preserve/mix multi-track MXF in MKV/MP4/MOV formats
- Merge/split/trim/crop MXF footages.
Best Multi-track MXF Converter Review
Pavtube iMixMXF vs Tipard MXF Converter for Mac
Top 5 Best MXF Converters for Mac


For more products of Pavtube Spring Promotion 2016, don’t hesitate to visit:https://www.facebook.com/pavtubefans/app/198826126804423/
No.4 Bestseller Pavtube Video Converter Ultimate for Windows/Mac with 50% OFF - Only $32
Key Features
- 2D/3D Blu-ray Ripper + DVD Ripper + ISO Converter + 4K Converter + 3D Converter + SD/HD Video Converter
- Save a 100% intact BD M2TS/ DVD VOB movie without extras
- Convert/Rip Blu-ray/DVD to virtually any video/audio format
- Decode and Encode H.265/HEVC, XAVC, etc. 4K Video to 4K/HD Videos
- Full disc copy with original BD/DVD structure
- Rip 2D/3D Blu-ray/Video and (HD)DVD to 3D MKV, MP4, MOV, WMV, AVI in Side by Side, Anaglyph and Top/Bottom 3 different modes
- Create playable video files for portable devices, game consoles, media players/servers, TVs, projector, VR headsets and more
- Create editable files for Non-linear editing systems like FCP, iMovie, EDIUS Pro 8/7/6, Adobe Premiere Pro CC/CS6/5/4/3, After Effects CC/CS6, Avid Media Composer, GoPro Studio, Sony Vegas Pro, Sony Movie Studio, Pinnacle Studio, Windows Movie Maker, MAGIX Movie Edit Pro HD, Corel VideoStudio Pro, Cyberlink PowerDirector and more
- A professional video editing tool with trim, crop, split, merge and other options
- Improve Blu-Ray Ripping & Copying Speed With GPU Acceleration
5 Reasons Why Choose Pavtube Video Converter Ultimate
Pavtube Video Converter Ultimate Review
Wondershare vs Pavtube Video Converter Ultimate


No.5 Bestseller Pavtube ByteCopy for Windows/Mac with 50% OFF - Only $21
Key Features
- Support All Blu-ray Related Copy Protections
- Lossless Backup Blu-ray and DVD movies to MKV container with multiple audio/subtitle tracks
- Allow full preservation of all audio/subtitles tracks and chapter markers
- Preserve a 100% BD M2TS/DVD VOB movie without extras
- Convert Blu-ray/DVD/ISO to Multi-track MP4, MOV, AVI, Apple ProRes
- Create 2D/3D Blu-ray/DVD to 3D MKV, MP4, MOV, WMV, AVI in Side by Side, Anaglyph and Top/Bottom 3 different modes
- Best solution to watch BD/DVD/ISO movies on portable devices, game consoles, media players/servers, TVs, projector, VR headsets, Non-linear editing system, etc.
- Support exporting forced subtitles and .srt external subtitles
- Support insert srt/ass/ssa subtitles to any movie file
- Remove unwanted audio tracks and subtitles streams at will
- Encode Blu-ray/DVD/ISO to H.265/HEVC MKV/MP4
- Fast conversion with NVIDIA CUDA/ AMD GPU acceleration technology
- Well compatible with Windows 10
- Customize Blu-ray/DVD with built-in video editor
ByteCopy Review
ByteCopy for Mac Review
MakeMKV vs ByteCopy vs DVDFab
Top 5 reasons to pick Pavtube ByteCopy on PC/Mac


No.6 Bestseller Pavtube BDMagic for Windows/Mac with 50% OFF - Only $24.5
Key Features
- 2D/3D Blu-ray Ripper + 2D/3D Blu-ray Copy + 2D/3D ISO Converter + DVD Ripper
- Bypass all copy & region protections
- Preserve the BD/DVD's original file structure by using "Copy the entire disc" function.
- Blu-ray and DVD Main title content copy
- Rip/Convert 2D/3D Blu-ray and DVD discs & ISO to various videos like MP4, AVI, MKV, MOV, WMV, MPG, FLV, SWF, etc.
- Rip and Encode Blu-ray and DVD to H.265/HEVC MP4/MKV
- Create 2D Blu-ray/DVD/ISO to 3D movies in Side by Side, Anaglyph and Top/Bottom 3 different modes
- Create playable video files for portable devices, game consoles, media players/servers, TVs, projector, VR headsets and more
-- Customizable video parameters and effect
- Customize Blu-ray/DVD with built-in video editor
- Fast conversion with NVIDIA CUDA/AMD GPU acceleration technology
Top 5 Reasons to choose Pavtube BDMagic
Pavtube BDMagic Review
Pavtube ByteCopy vs Pavtube BDMagic
Pavtube BDMagic vs Handbrake


No.7 Bestseller Pavtube DVDAid for Windows/Mac with 50% OFF - Only $17.5
Key Features
- Unlock Region Code & Copy Protections
- Superior support any kinds of DVD and ISO/IFO image files
- Back up DVD with 1:1 original quality
- Support HEVC/H.265 and M3U8 Output
- Convert DVD to common, HD, 3D and 4K video & audio in 250+ formats.
- Edit and personalize DVD instantly
- Convert 6X faster and keep excellent video quality
- Provide optimized preset formats for Mobile Devices/Game Consoles/TV/NLE/Web, etc.
Reviews: Pavtube DVDAid vs Slysoft AnyDVD
Top 5 Apple/Android DVD Ripper Review
Top 5 DVD Copy Review
Best DVD to MP4 Converter Review


Giveaway: First Five customers can share this page to your timeline, email us your order numer and the snapshot to win one more FREE license, no product limit!
If you have any problem to buy or use Pavtube, pls feel free to contact support@pavtube.com or
macsupport@pavtube.com
Note: The main products of Pavtube that improved Blu-ray/DVD ripping & video converting speed with GPU acceleration are BDMagic, ByteCopy, Video Converter Ultimate, DVDAid, Video Converter and so on.
No.1 Bestseller Pavtube HD Video Converter for Windows/Mac - Only $9.9
Key Features
- HD Video Converter + 4K Video Converter + 3D Video Converter + Audio Converter
- Convert All Popular HD Video and Audio Formats
- Support H.265/HEVC Encoding and Decoding
- Support Transcoding HD/4K Videos from all Camcorders & Cameras: Sony, Canon, Panasonic, Samsung, GoPro, Blackmagic, JVC, Nikon, DJI and more
- Export Apple ProRes/DVCPRO/HDV/Avid DNxHD/AIC/MPEG-2 for NLEs
- Support Presets for Almost All Popular Devices, game consoles, media players/servers, TVs, projector, VR headsets and more
- Support Batch Conversion with Fast Speed and Excellent Quality
- Edit Videos through Trimming, Cropping, Adding Watermarks, Insert Subtitles, etc.
- Support adding .srt/.ass/.ssa subtitles into any videos
Pavtube HD Video Converter for Mac Review
Best HD Video Converter Review
Top 5 Best HD Video Converter for Mac Review


No.2 Bestseller Pavtube Video Converter for Windows/Mac - Only $9.9
Key Features
- Convert from and to any common SD/HD/3D/4K video and audio format.
- Support Decoding and Encoding H.265/HEVC and XAVC 4K video
- Support Encode any videos to M3U8 for Apple devices
- 150+ ready presets for iPhone, iPad, Apple TV, Samsung, Google, TV, Surface, PS4, PS3, Xbox, WDTV and other mobile devices
- Support Apple ProRes/DVCPRO/HDV/Avid DNxHD/AIC encoding.
- Output Formats for Windows or Mac editing software, e.g. FCP X, iMovie, FCE, Avid, Adobe Premiere, Eduis Pro, GoPro Studio, WIndows Movie Maker, Sony Vegas Pro...
- 6X faster conversion speed and high output quality
- Support batch conversion - convert multiple files at the same time
- Edit and touch up your video in clicks (e.g. trimming, cropping, inserting SRT/ASS/SSA subtitle, etc)
Top 10 Video Converter Review
Top 4 Video Converter for Mac Review


No.3 Bestseller Pavtube multi-track MXF Converter for Windows/Mac - Only $9.9
Key Features
- Export MXF into MKV, MOV, and MP4 container with multiple audio tracks preserved
- Output multi-track Apple Prores MOV for further editing in Final Cut Pro (X)
- Mix multiple audio tracks/channels in MXF footage into one
- Make MXF files editable in mainstream video editing applications
- Convert MXF to any other formats for editing, playing, or broadcasting
- Convert 2D videos to 3D in MKV, MOV, AVI, MP4, WMV formats
- Support DVCPRO/HDV/Avid DNxHD/AIC output
- Import/preserve/mix multi-track MXF in MKV/MP4/MOV formats
- Merge/split/trim/crop MXF footages.
Best Multi-track MXF Converter Review
Pavtube iMixMXF vs Tipard MXF Converter for Mac
Top 5 Best MXF Converters for Mac


For more products of Pavtube Spring Promotion 2016, don’t hesitate to visit:https://www.facebook.com/pavtubefans/app/198826126804423/
No.4 Bestseller Pavtube Video Converter Ultimate for Windows/Mac with 50% OFF - Only $32
Key Features
- 2D/3D Blu-ray Ripper + DVD Ripper + ISO Converter + 4K Converter + 3D Converter + SD/HD Video Converter
- Save a 100% intact BD M2TS/ DVD VOB movie without extras
- Convert/Rip Blu-ray/DVD to virtually any video/audio format
- Decode and Encode H.265/HEVC, XAVC, etc. 4K Video to 4K/HD Videos
- Full disc copy with original BD/DVD structure
- Rip 2D/3D Blu-ray/Video and (HD)DVD to 3D MKV, MP4, MOV, WMV, AVI in Side by Side, Anaglyph and Top/Bottom 3 different modes
- Create playable video files for portable devices, game consoles, media players/servers, TVs, projector, VR headsets and more
- Create editable files for Non-linear editing systems like FCP, iMovie, EDIUS Pro 8/7/6, Adobe Premiere Pro CC/CS6/5/4/3, After Effects CC/CS6, Avid Media Composer, GoPro Studio, Sony Vegas Pro, Sony Movie Studio, Pinnacle Studio, Windows Movie Maker, MAGIX Movie Edit Pro HD, Corel VideoStudio Pro, Cyberlink PowerDirector and more
- A professional video editing tool with trim, crop, split, merge and other options
- Improve Blu-Ray Ripping & Copying Speed With GPU Acceleration
5 Reasons Why Choose Pavtube Video Converter Ultimate
Pavtube Video Converter Ultimate Review
Wondershare vs Pavtube Video Converter Ultimate


No.5 Bestseller Pavtube ByteCopy for Windows/Mac with 50% OFF - Only $21
Key Features
- Support All Blu-ray Related Copy Protections
- Lossless Backup Blu-ray and DVD movies to MKV container with multiple audio/subtitle tracks
- Allow full preservation of all audio/subtitles tracks and chapter markers
- Preserve a 100% BD M2TS/DVD VOB movie without extras
- Convert Blu-ray/DVD/ISO to Multi-track MP4, MOV, AVI, Apple ProRes
- Create 2D/3D Blu-ray/DVD to 3D MKV, MP4, MOV, WMV, AVI in Side by Side, Anaglyph and Top/Bottom 3 different modes
- Best solution to watch BD/DVD/ISO movies on portable devices, game consoles, media players/servers, TVs, projector, VR headsets, Non-linear editing system, etc.
- Support exporting forced subtitles and .srt external subtitles
- Support insert srt/ass/ssa subtitles to any movie file
- Remove unwanted audio tracks and subtitles streams at will
- Encode Blu-ray/DVD/ISO to H.265/HEVC MKV/MP4
- Fast conversion with NVIDIA CUDA/ AMD GPU acceleration technology
- Well compatible with Windows 10
- Customize Blu-ray/DVD with built-in video editor
ByteCopy Review
ByteCopy for Mac Review
MakeMKV vs ByteCopy vs DVDFab
Top 5 reasons to pick Pavtube ByteCopy on PC/Mac


No.6 Bestseller Pavtube BDMagic for Windows/Mac with 50% OFF - Only $24.5
Key Features
- 2D/3D Blu-ray Ripper + 2D/3D Blu-ray Copy + 2D/3D ISO Converter + DVD Ripper
- Bypass all copy & region protections
- Preserve the BD/DVD's original file structure by using "Copy the entire disc" function.
- Blu-ray and DVD Main title content copy
- Rip/Convert 2D/3D Blu-ray and DVD discs & ISO to various videos like MP4, AVI, MKV, MOV, WMV, MPG, FLV, SWF, etc.
- Rip and Encode Blu-ray and DVD to H.265/HEVC MP4/MKV
- Create 2D Blu-ray/DVD/ISO to 3D movies in Side by Side, Anaglyph and Top/Bottom 3 different modes
- Create playable video files for portable devices, game consoles, media players/servers, TVs, projector, VR headsets and more
-- Customizable video parameters and effect
- Customize Blu-ray/DVD with built-in video editor
- Fast conversion with NVIDIA CUDA/AMD GPU acceleration technology
Top 5 Reasons to choose Pavtube BDMagic
Pavtube BDMagic Review
Pavtube ByteCopy vs Pavtube BDMagic
Pavtube BDMagic vs Handbrake


No.7 Bestseller Pavtube DVDAid for Windows/Mac with 50% OFF - Only $17.5
Key Features
- Unlock Region Code & Copy Protections
- Superior support any kinds of DVD and ISO/IFO image files
- Back up DVD with 1:1 original quality
- Support HEVC/H.265 and M3U8 Output
- Convert DVD to common, HD, 3D and 4K video & audio in 250+ formats.
- Edit and personalize DVD instantly
- Convert 6X faster and keep excellent video quality
- Provide optimized preset formats for Mobile Devices/Game Consoles/TV/NLE/Web, etc.
Reviews: Pavtube DVDAid vs Slysoft AnyDVD
Top 5 Apple/Android DVD Ripper Review
Top 5 DVD Copy Review
Best DVD to MP4 Converter Review


